Sunday, April 24, 2016

What do GPT and MBR do


You have to partition a disk drive before you can use it . MBR (master boot Record ) and GPT (GUID partition table ) are two different ways of storing the partitioning information on a drive .this information includes where partitions start and begin so your operating system know hich sectors belong to each partition and which partition is bootable .this is why you have to choose MBR or GPT before creating partitions on a drive

MBR

MBR standards for Master Boot Record. It was introduced with IBM PC dos in 1983
it's called Master Boot Record because the MBR is a special boot sector located at the beginning of a drive. this sector contains a boot loader for the installed operating system and information about the drive's logical partition .the boot loader is small but of code that generally loads the larger boot loader from another partition on a drive. if you have windows installed the initial bits of the windows boot loader reside here ---- that's why you may have to repair your MBR it is a overwritten and Windows won't boot it you have Linux installed , the GRUB boot loader will typically be located in the MBR.

MBR Limitation

* MBR works with disks up to 2 TB in size, but it can't handle disks with more than 2TB of space. MBR also only supports up to four primary partitions -- if you want more you have to make one your primary partitions an "extended partition “and create logical partitions inside it this is a silly little hack and shouldn't be necessary.
*MBR became the industry standard everyone used for partitioning and booting form disks. Developers have been piling on hacks like extended partitions ever since

GPT

GPT stands for GUID Partition table .it's a new standard that’s gradually replacing MBR. it's associated with UEFI --- UEFI replaces the clunky old BIOS with something more modern , and GPT replaces the clunky old MBR partitioning system with something  more modern .it's called GUID partition table because every partition on your drive has a "globally unique identifier" or GUID - a random string so long that every GPT partition on earth likely has own unique identifier.

GPT Limitation

This system doesn't have MBR's limits .Driver can be much ,much larger and size limits will depend on the operating system and its file systems GPT allows for a nearly unlimited amount of partition, and the limit here will be your operating system -- windows allows up to 128 partition on GPT drive , and you don't have to create an extended partition

* On an MBR disk the partitioning and boot is stored in one place .if this data is overwritten or corrupted , you trouble . in contrast GPT stores multiple copies of this data access the disk.so it much more robust and can recover if the data is corrupted .GPT also stores cyclic redundancy check (CRC )values to check that its data is intact -- if the data is corrupted GPT can notice the problem and attempt to recover the damaged data form another location on the disk .MBR had no way of knowing it its data was corrupted --- you'd only see there was a problem when the boot process failed or your drive's partition vanished.,

Friday, April 15, 2016

How to perform a clean installation of Windows


  1. Turn on your PC so that Windows starts normally, insert the DVD or USB flash drive, and then shut down your PC.
  2. Restart your PC, and then press any key to boot from the DVD or USB flash drive.
    If you restart your PC and your current version of Windows starts, you might have to open a boot menu or change the boot order in your PC's BIOS or UEFI settings so that your PC boots from the media. To open a boot menu or change the boot order, you'll typically need to press a combination of keys (such as F2, F12, Delete, Esc, etc.) immediately after you turn on your PC. For instructions on changing the boot order for your PC, check the documentation that came with your PC or go to the manufacturer's website.
    If your current version of Windows still starts, try again by waiting until Windows asks you to sign in, shutdown completely, and then restart your PC again.
  3. On the Install Windows page, enter your language and other preferences, and then tap or click Next.
  4. Tap or click Install Windows.
  5. On the Enter the product key to activate Windows page, enter your product key.
    The product key should be on the box that the Windows 8.1 DVD came in, or in a purchase confirmation email. It looks like this: PRODUCT KEY: XXXXX-XXXXX-XXXXX-XXXXX-XXXXX.
  6. On the Please read the license terms page, if you accept the license terms, tap or click I accept the license terms, and then tap or click Next.
  7. On the Which type of installation do you want? page, tap or click Custom.
  8. On the Where do you want to install Windows? page, do one of the following:
    • In Windows 8.1, tap or click the partition that you want, tap or click the formatting option you want to perform if needed, and then follow the instructions.
    • In Windows 8, tap or click Drive options (advanced), tap or click the partition that you want to change, tap or click the formatting option you want to perform if needed, and then follow the instructions.
  9. When you've finished formatting, tap or click Next.
  10. Follow the instructions to finish installing Windows.

Thursday, April 14, 2016

Update the storage controller driver during Windows 7 setup


You might need to update the driver for your PC’s storage controller. This driver controls how the hard drive interacts with the rest of the PC. To do this:
  1. Find the type of storage controller your PC uses by checking the documentation that came with your PC or going to the manufacturer’s website.
  2. On a second PC, go to the manufacturer’s website and download the latest driver on a USB flash drive or other removable media.
  3. Start Windows 7 installation again, and on the Where do you want to install Windows? page, click Load Driver.
  4. Insert the removable media containing the driver into your PC, and click OK.
  5. Select the driver from the list of results and then click Next. Follow the instructions on your screen to continue installing Windows 7

Method 2

  1. 1.Check whether the hard disk is recognized by BIOS.

    If there is no error message shown, we suggest trying this method at first. Of course, even if error messages are given, you can also try this solution prior to doing any operation. Please start computer, press a specified key for several times to enter BIOS, and then look for your hard drive. If it is missing or invisible from BIOS (shown as None or Not detected), here are 4 possible reasons as well as countermeasures:
    • The channel for this hard drive is forbidden in BIOS, which happens especially after you add a second hard drive to system. To fix this issue, we need to turn it on or enable it.
    • Data cable or power cable of the drive is damaged or isn’t plugged firmly. Try connecting both cables again or change other cables.
    • BIOS is out of date and can’t recognize your hard disk. Try updating BIOS or driver of BIOS to the latest version.
    • The hard drive may be physically damaged. Download a disk testing tool to test the drive. If it is not detected by the tool or errors are found, you may need to contact your hard disk provider.

    After you are doing these attempts, the hard disk might be detected by BIOS, and then you can go on installing Windows. But if the disk is still invisible, you may need to contact your hard disk manufacturer for help. 

    Actually, when checking in BIOS, you may find the hard disk is detected in BIOS but missing from the “Where do you want to install Windows” screen. At this time you need to try the following solutions. 
  2. To load a storage controller driver when operating system is unbootable or there is no system, please follow operations below:
    • Find the type of storage controller (could be IDE, SCSI, SATA, and so on) your computer uses by checking the documentation coming with the computer or directly going to the manufacturer’s website.
    • Download the latest driver for your computer’s storage controller to a USB flash drive, CD, or other removable devices. Tip: you may need to unzip the downloaded file before copying it to removable device.
    • Start installing or reinstalling Windows again, and on the “Where do you want to install Windows?” screen, please click Load Driver.
    • Insert the removable media that contains the driver into the computer, and click OK. After that, Windows will search for the driver on all available devices, and then list all available drivers.
    • Select the driver that matches your hard drive and click Next to continue.

Wednesday, April 13, 2016

METHOD 1

HKEY_LOCAL_MACHINE\SOFTWARE\Microsoft\Windows NT\CurrentVersion\AppCompatFlags\UpgradeExperienceIndicators
And in right-side pane, make sure values of UpgEx and UpgExU are set to Green. If their values are different, change them to Green.
Also make sure Genuine string is set to 1.
If you can't find above mentioned values in "UpgradeExperienceIndicators" key, you'll need to create them manually. You can match values of all available strings with following screenshot:

NOTE 2: If you see another key with the name REDUCED under UpgradeExperienceIndicatorskey, it means the "Get Windows 10" app is running under reduced mode. It happens when your computer hardware is not compatible with Windows 10 upgrade. In such case, as mentioned inpoint 4 of "Important Things to Know" above, the app icon in system tray will automatically appear after Windows 10 launch date i.e. July 29, 2015. So you should wait of Windows 10 
METHOD 2:
If the upgrade app has been installed in your computer, you can try to manually run the app by going to "C:\Windows\System32\GWX" folder and run GWX.exe file.
It'll add the icon to Taskbar and then you can access the app by clicking on the icon.
NOTE: If you still don't see the icon in Taskbar, open Command Prompt as Administrator and run following commands one by one:
C:\Windows\System32\GWX\GWXConfigManager.exe /RefreshConfig
C:\Windows\System32\GWX\GWX.exe /taskLaunch
Now the icon should be visible in Taskbar notification area.

You can drag the screen to left or right to scroll between tiles. You can change the user name shown at the right-top corner of the screen by clicking on it.

  • Socialite Tile for Facebook
  • Tweet@rama for Twitter
  • News Tile
  • Weather Tile
  • Gmail Tile
  • Piano
  • Various Shortcut tiles which can be configured
  • Angry Birds Game
  • Fruit Ninja Game
  • Many more
It also comes with a Windows 8 look like lock screen and Control Panel application.
It consumes very less CPU resources and can be installed in both 32-bit and 64-bit Windows editions.
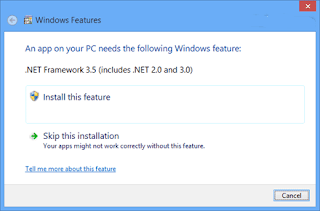
Whenever you try to open a program requiring .NET Framework 3.5, you get following message:
An app on your PC needs the following Windows feature:
.NET Framework 3.5 (includes .NET 2.0 and 3.0)
So without wasting time lets start 
1. First you'll need to copy Windows 8 setup files to your hard disk. If you have Windows 8 setup ISO copied in your system, you can mount it by right-click on it and select "Mount" option or you can extract its content using
If you have Windows 8 setup disc and don't want to copy its content, its ok. Just insert the disc in your CD/DVD drive so that Windows can access its content.
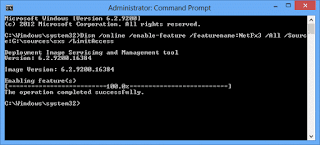
2. Now open Command Prompt as Administrator as mentioned here and then provide following command:
Dism /online /enable-feature /featurename:NetFx3 /All /Source:F:\sources\sxs /LimitAccess
Here "F:" represents the CD/DVD drive letter in your system which contains Windows 8 setup disc. Replace it with the correct drive letter according to your system.
If you extracted Windows 8 setup files in a directory, replace F:\sources\sxs with the correct path.
3. As soon as you execute the above mentioned command, Windows will start installing .NET Framework 3.5 in your system and it'll not require Internet connection.

It'll take a few minutes and you'll get a message that the operation completed successfully.

4. That's it. Now you have installed .NET Framework 3.5 in Windows 8 without using Internet connection.
PS: If you face any problem while using this method, you can take help of following exclusive AskVG app to automatically install .NET Framework 3.5 offline in Windows 8 and 8.1:
 Downlod Link

Saturday, April 9, 2016

Thursday, April 7, 2016


1. Choose right edition of EaseUS Partition Master and install it. After that, launch EaseUS Partition Master.
2. Select dynamic disk which you want to Convert to basic disk on the disk map, click "Disk" on main menu and choose "Convert to basic disk" or right click the dynamic disk and choose "Convert to basic disk".
3. Click "Apply" to convert dynamic disk to basic disk. After EaseUS Partition Master applies these changes, you will see the dynamic disk has become basic disk in Windows Disk Management. And then you can use "Resize/Move partition" feature to resize partitions on the basic disk. (Tips: It is important to backup data before resizing partition, because nothing is 100% secure.)

Case 2: Convert dynamic disk to basic disk with disk management

To convert mirrored volumes, you need to break mirrored volumes by using Windows Disk Management and then convert dynamic disk to basic disk with the "Convert to basic disk" feature of EaseUS Partition Master.
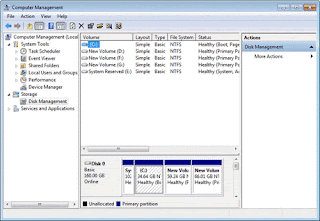
1. Right click "My Computer" and choose "Manage" -> "Storage" -> "Disk Management", right click the mirrored volumes and choose "Break Mirrored Volume" to break mirrored volumes or choose "Remove Mirror" to remove mirror. If the boot/system partition is on the mirrored volumes, you can only choose "Remove Mirror" to remove mirror. Please backup your important data before this operation.
2. After choosing "Break Mirrored Volume" or "Remove Mirror", the mirrored volumes will become simple volumes. Follow the steps in Case 1 to complete converting dynamic disk containing simple volumes to basic disk.


To reactivate a dynamic disk by using the Windows interface

  1. In Disk Management, right-click the disk marked Missing or Offline.
  2. Click Reactivate Disk. The disk should be marked Online after the disk is reactivated.

To reactivate a dynamic disk by using a command line
  1. Open a command prompt and type diskpart.
  2. At the DISKPART prompt, type list disk. Make note of the disk number of the missing or offline disk that you want to bring online. Missing disks are numbered M0, M1, M2, and so on, and offline disks are numbered 0, 1, 2, and so on.
  3. At the DISKPART prompt, type select disk <disknumber>.
  4. At the DISKPART prompt, type online.

Method 1


  1. Back up or move the data on the basic master boot record (MBR) disk you want to convert into a GUID partition table (GPT) disk.
  2. If the disk contains any partitions or volumes, right-click any volumes on the disk and then click Delete Partition or Delete Volume.
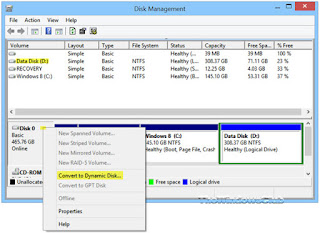
  3. Right-click the MBR disk that you want to change into a GPT disk, and then click Convert to GPT Disk.

    Method 2

    1. Back up or move the data on the basic master boot record (MBR) disk you want to convert into a GUID partition table (GPT) disk.
    2. Open an elevated command prompt (right-click Command Prompt, and then click Run as Administrator) and type diskpart. If the disk does not contain any partitions or volumes, skip to step 6.
    3. At the DISKPART prompt, type list disk. Make note of the disk number you want to convert.
    4. At the DISKPART prompt, type select disk <disknumber>.
    5. At the DISKPART prompt, type clean.
      6.  At the DISKPART prompt, type convert gpt.

Method 1

  1. Back up or move all volumes on the basic GUID partition table (GPT) disk you want to convert into a master boot record (MBR) disk.
  2. If the disk contains any partitions or volumes, right-click any volumes on the disk and then click Delete Volume.
  3. Right-click the GPT disk that you want to change into an MBR disk, and then click Convert to MBR disk.

    Method 2

    1. Back up or move all volumes on the basic GUID partition table (GPT) disk you want to convert into a master boot record (MBR) disk.
    2. Open an elevated command prompt and type diskpart. If the disk does not contain any partitions or volumes, skip to step 6.
    3. At the DISKPART prompt (right-click Command Prompt, and then click Run as Administrator), type list disk. Make note of the disk number you want to delete.
    4. At the DISKPART prompt, type select disk <disknumber>.
    5. At the DISKPART prompt, type clean.
      6. At the DISKPART prompt, type convert mbr.

  1. Back up all volumes on the disk you want to convert from dynamic to basic.
  2. In Disk Management, right-click each volume on the dynamic disk you want to convert to a basic disk, and then click Delete Volume for each volume on the disk.
  3. When all volumes on the disk have been deleted, right-click the disk, and then click Convert to Basic Disk.


  1. Back up all volumes on the disk you want to convert from dynamic to basic.
  2. Open a command prompt and type diskpart.
  3. At the DISKPART prompt, type list disk. Make note of the disk number you want to convert to basic.
  4. At the DISKPART prompt, type select disk <disknumber>.
  5. At the DISKPART prompt, type detail disk <disknumber>.
  6. For each volume on the disk, at the DISKPART prompt, type select volume= <volumenumber> and then type delete volume.
  7. At the DISKPART prompt, type select disk <disknumber>. Specify the disk number of the disk that you want to convert to a basic disk.
  8. At the DISKPART prompt, type convert basic.

  1. Insert the formatted USB drive in the USB post of your computer and run theWinSetupFromUSB_1-0-beta7.exe.
  2. Make sure that the utility has detected your USB drive.
  3. Now, enable the option Windows 2000/XP/2003 Setup selecting the check box and browse to the Windows XP installation file location. Next, enable the option Vista/7/Server 2008 Setup/PE/RecoveryISO and browse to the Windows 7 installation files’ location. In both cases, if you have the ISO images, extract them by WinRar or 7-Zip.
    4. Click the Go button to get started. Wait for some time and your multi-boot USB stick will ready within a while. It may take several minutes.

  1. Insert a USB flash drive into a running computer.
  2. Open a Command Prompt window as an administrator.
  3. Type diskpart.
  4. In the new command line window that opens, to determine the USB flash drive number or drive letter, at the command prompt, type list disk, and then click ENTER. The list disk command displays all the disks on the computer. Note the drive number or drive letter of the USB flash drive.
  5. At the command prompt, type select disk <X>, where X is the drive number or drive letter of the USB flash drive, and then click ENTER.
  6. Type clean, and the click ENTER. This command deletes all data from the USB flash drive.
  7. To create a new primary partition on the USB flash drive, type create part pri, and then click ENTER.
  8. To select the partition that you just created, type select part 1, and then click ENTER.
  9. To format the partition, type format fs=ntfs quick, and then click ENTER.
    1. Type active, and then click ENTER.
    2. Type exit, and then click ENTER.
    3. When you finish preparing your custom image, save it to the root of the USB flash drive.

Kategori

Powered by Blogger.

Recent in Sports

Breaking News

top

LinkCollider - Free SEO Tools Plus Social Media Sharing

Popular Posts

Recent Posts